Are you having trouble with your Windows 10 image? Don’t worry! You don’t need to be an experienced tech guru to repair it. All you need is the DISM command tool and a few simple steps, and you’ll have your operating system up and running in no time.
Feel like part of the tech-savvy club by learning to use this powerful command line utility that will get you back on track fast! In this article, we’ll show you precisely what to do so that you can follow along confidently and feel proud of yourself for taking control of your computer repairs.
Don’t let technology intimidate or overwhelm you — instead, take charge and join the ranks of those who know their way around computers! Read on for our guide on using the DISM command tool to repair your Windows 10 image without fuss.
Overview
Powerful, practical, and potent – the DISM command tool is an invaluable asset in repairing a Windows 10 image. This powerful Microsoft utility can help get your computer back on track quickly from fixing corrupted files to troubleshooting system errors. Whether dealing with digital disasters or simply seeking solutions for pesky problems, this powerful program packs a punch of potential.
DISM stands for Deployment Image Servicing and Management, indicating just how versatile an application it is. It helps repair broken elements within the operating system and allows users to customise their environment without reinstalling the entire OS from scratch. Whatever issue you’re facing with your PC can be resolved more efficiently than ever.
Whether you want to update drivers, install components or make tweaks to improve performance, using DISM offers a reliable way to do so without taking too much time out of your day. So if you’ve been looking for ways to fix computer issues, read on as we guide you through downloading and installing this handy tool!
Downloading And Installing The Tool
The Deployment Image Servicing and Management (DISM) command-line tool is a great way to repair Windows 10 images. To get started, you need to download and install the software first.
Fortunately, DISM is included in all modern Windows 10 as part of the operating system’s installation package. You can find it by typing “dism” into your computer’s search bar when running any Windows 10. Once you locate it, installing the tool takes only seconds.
After that, you’re ready to use DISM for repairing or analysing an image file on your computer. With its wide range of features, this powerful tool will give you more control over managing and restoring your system’s settings if something goes wrong.
Ready to take full advantage? Let’s dive into setting up the command line!
Setting Up The Command Line
Now that you have the DISM Command Tool downloaded and installed, it’s time to set up the command line. Configuring this powerful tool can be like navigating a maze, but with perseverance and patience, it is possible.
The first step in setting up the command line is to open an elevated command prompt window. To do this, type ‘cmd’ into your Start menu search box or press Windows Key + R on your keyboard. Then, click Ok and type “CMD” (without quotation marks) into the Run dialogue box. When prompted, select ‘Run as Administrator’.
Once you’ve opened the elevated command prompt window, typing “DISM /?” will display all available options, which provide information on how to use each command option correctly. The switches indicate what parameters are required for each parameter and provide helpful hints about their usage. With these instructions in front of you, it becomes easier to properly configure the DISM Command Tool to work effectively when attempting to repair a Windows 10 image file.
With careful planning and attention to detail, you should be ready to use the DISM Command Tool. Armed with this knowledge and understanding of its features, you can take control of any issues related to repairing Windows 10 image files–no matter how complex they may seem at first glance!
Basic Commands
The DISM command-line tool is a powerful way to repair Windows 10 images. It can be used for various tasks, including improving corrupted files, checking the integrity of image components, and adding drivers and packages. You’ll need to know some basic commands to get started with this tool.
First up is CheckHealth: This command verifies that all protected system files in the specified image are intact and consistent. If any problems are found, it will report them to correct them before attempting further repairs or modifications.
Next is ScanHealth: This command scans an online or offline image for potential corruption issues; if any are detected, it will provide detailed information about what needs to be repaired or replaced. Finally, there’s RestoreHealth: This command performs an automated scan and repair process on the specified image – very useful when dealing with complex problems like missing or damaged system files.
With these three essential commands, you’re well on your way to troubleshooting even the most stubborn Windows 10 errors. Now let’s look at another critical option available in DISM – the cleanup-image option…
Cleanup-Image Option
The Windows 10 image repair process is made easy with the help of the Dism command tool. One must use the Cleanup-Image option to clean up a corrupted or damaged Windows 10 image. This can be done by entering “Dism /Cleanup-image” in the Command Prompt window, allowing users to remove any unnecessary files from their system and repair corruptions within the operating system. The Cleanup-Image option gives users more control over what gets deleted from their computer as it allows them to choose specific folders for removal instead of deleting everything indiscriminately.
Using this method also saves time since it does not require users to manually search through all of the folders on their computer to find the necessary ones; they enter what they want to be deleted into the command line. Additionally, it helps eliminate errors that might occur due to the incorrect deletion of files resulting from manual searching. Moreover, this procedure effectively cleans and optimises disk space while saving valuable data from being inadvertently removed.
Consequently, using Cleanup-Image ensures a smooth and efficient cleanup without causing further damage to existing programs or settings on your machine. By taking advantage of this powerful yet simple feature, you can have peace of mind knowing that your Windows 10 image has been fully restored to its original state.
Restore-Health Option
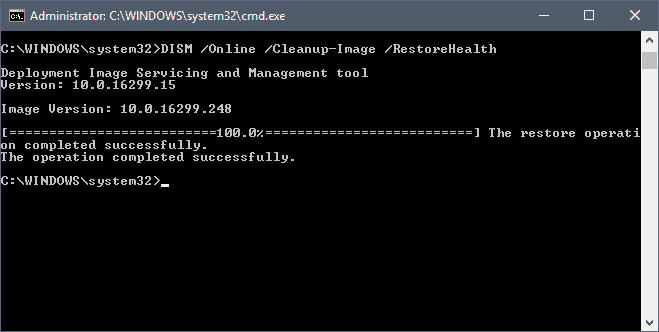
The Restore-Health option in the DISM command tool is a powerful and effective way of repairing Windows 10 images. Users must open an elevated Command Prompt window with administrator privileges to use it. From here, they can run the command ‘DISM/Online/Cleanup-Image/Restorehealth’, which will scan for any component store corruption that may be present on their system image. This will help identify and fix errors or corrupt files, allowing users to restore their systems.
Once this process has been completed, any issues should be resolved. However, if there are still problems after the Repair Health scan, users may need to consider using the Check Health option instead (covered in our next section). As such, running the Restore-Health function first could prove much more efficient – resolving potential issues without going further down the line regarding troubleshooting processes.
Getting your system back up and running quickly matters most when dealing with corrupted system images. Thankfully, by using DISM’s Restore-Health feature, you’ll be well on your way towards achieving that. Moving onto how we can use Check Health…
Check Health Option
Continuing from the previous section, it’s time to explore the Check Health option of the dism command tool. This powerful feature has been designed to help system administrators quickly diagnose any problems with a Windows 10 image and take corrective action as soon as possible. With its immense capabilities, this option can be used to assess the overall health of an operating system or individual components within it – all without ever having actually to install them!
The first step in using the Check Health option is identifying what specific elements are being checked for. It’s important to note that this particular function will detect not all potential issues; instead, it should only be used when there’s a suspicion that something might be wrong with one or more parts of the OS. Once these elements have been identified, running a scanhealth command against each individual can provide detailed information about potential errors or warnings.
For further granularity, users also have access to additional parameters such as /scanfile and /scannow, allowing them to narrow their search even further. Additionally, they can use options like /logpath and /verbose to create a log file containing details on every element scanned during the process so that any discrepancies can be investigated further if necessary.
In addition to diagnosing issues with individual files or components, Check Health provides valuable insights into how well specific updates or patches work on a machine. By running scans before and after applying changes, IT professionals can ensure everything functions correctly and know whether those tweaks had any noticeable impact on performance or stability. All in all, this simple but effective feature ensures that system admins have complete control over their environment at all times – giving them greater peace of mind about maintaining optimal levels of security and reliability for their machines.
Scanhealth Option
The Scanhealth option is an important part of the dism command tool for repairing Windows 10 images. It scans a Windows image and detects potential problems that might prevent it from running correctly. This can be especially useful when troubleshooting an issue or installing a new piece of software on your machine.
When using this option, you’ll need to provide the path to where you have stored the Windows 10 image file. The system will then start scanning it for any errors or issues that may be present. If anything is found, it will display them in a list so you can take appropriate measures to fix them before attempting to repair the image further.
This feature is also possible with other tools, such as ImageX and DISM Cleanup-Image. These allow more advanced features, such as removing damaged files and restoring corrupted data, but they require more technical knowledge than just using Scanhealth alone. To get the most out of these tools, understand how they work and what options are available before proceeding. Transition Sentence: After thoroughly examining your Windows 10 image with Dism’s Scanhealth Option, it’s time now to look at its ‘repair-windowsimage’ option, which helps restore faulty components within the OS itself.
Repair-Windowsimage Option
A Repair-WindowsImage option is a powerful tool for repairing Windows 10 images. It allows you to fix broken components, recover lost files and restore system settings from corrupt or damaged installations. This command line utility lets you quickly troubleshoot problems with corrupted or missing system files without reinstalling the operating system.
To use the Repair-WindowsImage utility in Windows 10, open an elevated command prompt window on your computer by pressing the “Win + X” key combination and selecting Command Prompt (Admin). Then type “DISM /Online/Cleanup-Image/RestoreHealth” into the text box that appears and press Enter. This will start repairing any errors found in your image file. The process may take some time, depending on how many faults have been detected within the image.
Once completed, reboot your PC and check if all its features are working correctly. If not, try running other DISM commands, such as Checkhealth and Scanhealth, which can detect more specific issues related to your installation’s integrity. You should now be able to enjoy your newly repaired Windows 10 image! Ready for a new section about restoring image backups using DISM? Let’s go!
Restore Image Backup Using Dism Tool
Restoring a Windows 10 image backup is one of the easiest ways to fix system issues and restore your computer to its original configuration. The DISM command tool, Deployment Image Servicing and Management (DISM), can repair corrupted files in a Windows 10 image file. Here’s how you can use it:
| Step | Description | Command |
|---|---|---|
| 1 | Mount the ISO File or Insert Install Media into the Drive | Dism /Mount-Image /ImageFile:”[path]install.wim” /index:1 /MountDir:[drive]:mountdir |
| 2 | Repair Corrupted Files using Restore Health Option | Dism /image:[drive]:mountdir/ /Cleanup-Image /RestoreHealth |
| 3 | Unmount the ISO File or Remove Install Media from the Drive | Dism /Unmount-Image /MountDir:[drive]:mountdir /discard |
This process will help you quickly fix any corrupted files on your Windows 10 device without completely reinstalling. To ensure that your install media has no missing critical components, DISM offers full scan capabilities, so you always have an accurate picture of what’s included in the image file. This ensures all necessary components are present and working correctly when restoring an image backup. With just these three simple steps, you will have restored your image successfully, providing peace of mind knowing that everything is back up and running with minimal disruption to your day-to-day activities. Now let’s look at some limitations of the DISM tool…
Limitations Of Dism Tool
Despite its many advantages, Windows 10’s DISM tool has certain limitations that should be considered. First, the feature only works on images created with a particular version of Windows 10. It may not work correctly if an image is created using earlier versions or other operating systems. Additionally, while it can repair corrupt or missing files within an image, it cannot recover deleted data or restore lost partitions. Finally, it doesn’t provide any security against malicious attacks such as malware or viruses; users must still use additional antivirus software to protect their computers from these threats. While there are some drawbacks to using this utility, it remains one of the most effective ways to repair a damaged Windows 10 image. With proper understanding and usage, you can quickly get your system back up and running.
Now let’s move on to troubleshooting common issues related to repairing windows 10 images with the DISM command tool.
Troubleshooting Common Issues
If you’re having difficulty using the DISM Tool to repair your Windows 10 image, you can take several troubleshooting steps. Firstly, ensure the operating system is up-to-date and that all available updates have been installed. Additionally, check if your antivirus software or firewall may block access to specific folders or files.
Another common issue is an incompatibility between Windows 10 and the DISM tool versions. Ensure you’re running a compatible version of the DISM tool and Windows 10 before attempting any repairs. Also, ensure you have sufficient disk space by freeing up some hard drive space on your computer.
Finally, try restarting your computer, as this often solves many issues related to repairing images with the DISM tool. If these steps don’t resolve your problem, you’ll likely need advanced help from an experienced technician who knows how to use the dism command line. With their assistance, they can further investigate why the repair process isn’t working correctly for you.
Advanced Use Cases Of Dism Tool
DISM is a powerful tool, and its uses go far beyond just repairing Windows 10 images. Here are the three most advanced use cases for DISM:
- Mounting Install Images – With DISM, you can mount an install image, add or remove files, and edit components of the installation process. This allows you to customise your Windows installation in ways that wouldn’t be possible otherwise.
- Removing Bloatware – If you want to get rid of pre-installed apps on your PC, then DISM is the tool for the job. You can easily uninstall bloatware with a few commands and reclaim space on your hard drive.
- Deployment Image Servicing & Management (DISM) – DISM also allows users to create deployment images which they can then use to deploy multiple copies of their OS quickly over a network without having to configure each machine separately manually.
These features will give tech savvy users more control over their machines than ever before, allowing them to truly make their PCs their own – no matter what version of Windows they’re running! And best of all, using DISM requires only minimal knowledge of command line tools; anyone comfortable using CMD should have no trouble getting started with it. As such, it’s easy to see why this versatile tool has become so popular among IT professionals and hobbyists.
Alternatives To The Dism Tool
Other options are available for those who need to repair a Windows 10 image but don’t want to use the DISM tool. First is SFC (System File Checker), which can scan and replace corrupted system files. It’s easy to run from the command line and is exceptionally reliable. Additionally, it has been included in every version of Windows since XP, so there’s no reason not to have it installed on your machine.
Next is DSIM (Deployment Image Servicing Management). This tool allows you to manage images used for deployment, such as creating packages or installing applications. Unlike SFC, this one requires some technical knowledge to be properly utilised; however, if you know what you’re doing, it can be an incredibly effective way of repairing Windows 10 images.
Finally, there’s also the popular third-party application, DISM GUI – for Graphical User Interface. This program offers a more user-friendly approach when making repairs and modifications to Windows OS images without needing all of the expert technical knowledge that comes with using DSIM or SFC directly from the command line. In addition, it supports multiple languages and provides detailed logs so users can track their progress through each step of the process. Transitioning into a summary section about all three alternatives, these tools offer different features depending on individual preferences. While DISM may be ideal for experienced professionals looking for advanced control over their system images, SFC and DSIM GUI offer user-friendly approaches suitable even for novice computer users wanting quick results.
Summary
The Windows 10 Dism command tool is essential for repairing and managing the operating system image. It enables users to manage, repair, mount, customise and deploy images on their computer systems. Dism can fix corrupt images or update existing ones with new drivers and software packages. This article discussed using the Dism command line tool to repair a Windows 10 image.
| Image | Steps | Result |
|---|---|---|
| ![alt]() | 1. Open Command Prompt 2. Type dism /online /cleanup-image/restorehealth 3. Then press Enter |
The corrupted Windows 10 image will be repaired automatically after you hit enter. |
The DISM tool provides several advantages over other repair methods, such as SFC Scanning or manual repairs. Firstly, it is fast and efficient – taking less than 30 seconds in most cases – which makes it ideal for quick fixes or emergencies when time is of the essence. Secondly, using the DISM Tool allows you to maintain control over what gets fixed in your system by specifying specific parameters that dictate its behaviour during repair processes; therefore giving more precision control over the result compared to alternative methods like SFC scanning, where results are often unpredictable due to automated decisions taken by the software itself without user input. Finally, unlike manual repairs requiring expertise and experience in registering registry entries, DISM requires no prior knowledge as all steps involve entering commands into the command prompt window – making it much easier for even novice users with no technical background whatsoever!
DISM may seem intimidating at first, but once you understand how it works – it can be used quickly enough even by beginner level users who have never touched a single line of code before! With just a few simple executions of commands from within windows Powershell or CMD prompt window – one can quickly get back up and running again with a fully functioning copy of Windows 10 without ever needing to take drastic measures such as reinstalling the entire OS from scratch! So if you find yourself stuck trying to figure out how best to repair your damaged Windows 10 Image, try using DISM –you might be surprised at just how easy & effective it is!
Frequently Asked Questions
What Other Tools, Can Be Used To Repair Windows 10 Images?
Sometimes repairing Windows 10 images can seem like an impossible task. But don’t worry; we’ve got your back! Here at ItFix, we know that the DISM command tool is a great way to repair a damaged image of Windows 10. However, other tools are available to help you through this tricky process.
Regarding alternative solutions for repairing a corrupted or broken image of Windows 10, one option is using the System File Checker (SFC). The SFC scans all protected system files and repairs any issues found with them by replacing them with a cached version stored in the %WinDir%System32dllcache folder on your computer. This utility should be used only if you cannot boot into safe mode or use another troubleshooting tool such as System Restore or Automatic Repair. You may also want to consider running the Deployment Image Servicing and Management (DISM) tool before running SFC so that it might fix any problems preventing SFC from completing its job successfully.
Another potential solution for fixing Windows 10 image errors is downloading third-party recovery software such as EaseUS Data Recovery Wizard Free Edition. It can quickly scan your hard drive and search for lost data, including photos, documents, emails etc., allowing users to quickly recover their precious memories without resorting to more drastic measures such as reinstalling Windows completely. And best of all? It won’t cost you a penny! All these options provide potent ways of tackling difficult situations when attempting to repair your windows 10 image – so why not try them?
Is There A Way To Repair A Windows 10 Image Without Using The Dism Tool?
If you’re looking for a way to repair your Windows 10 image without using the DISM tool, this article is here to help. The DISM command line tool has become essential to maintaining and fixing any Windows system, but it’s not always necessary when dealing with issues related to images. In this article, we’ll explore some alternative solutions that can be used to repair Windows 10 images.
One option available is System File Checker (SFC). This utility scans all protected files on your computer and verifies their integrity against Microsoft’s version of them in the component store. Suppose there are any discrepancies between what SFC finds and what should exist according to Microsoft. In that case, SFC will try to restore those corrupted or missing files from the cache folder or download them again from the internet if they aren’t found in the cache. If specific components have been removed or changed by malicious software, SFC can detect and replace these changes accordingly.
Finally, another simple solution could be performing an in-place upgrade instead of relying on the DISM tool. An in-place upgrade allows users to keep their existing operating system while upgrading it simultaneously – meaning that no data would be lost during the process and only minimal setup would be required afterwards. It’s important to note that this method may need additional disk space and enough free storage space on your hard drive before beginning the upgrade process.
In short, there are several alternatives available when repairing a Windows 10 image beyond using the DISM tool – such as System File Checker or even an in-place upgrade – so don’t feel like you have to resort solely to one particular solution when addressing potential problems with your PC’s imaging capabilities!
How Long Does Repair A Windows 10 Image Using The Dism Tool Take?
Repairing a Windows 10 image with the DISM tool can be daunting, but it doesn’t have to be. This comprehensive guide will tell you how long it takes and provide helpful tips for getting your Windows 10 image back up and running quickly.
The amount of time to repair a windows 10 image using the DISM tool depends on several factors, such as whether the original installation was from an ISO file or USB stick, what type of hardware is being used, and how large the image file is. Generally speaking, repairing a windows 10 image should take anywhere between 15 minutes and 30 minutes, depending on these variables. If any additional tasks are required (such as reinstalling applications), then this could add to the total time needed.
So if you want to get your Windows 10 system repaired ASAP, consider downloading all necessary components beforehand, such as drivers and updates, to speed up the process significantly. Additionally, ensure that your computer has enough RAM to handle larger files more efficiently when working with them in DISM mode. Finally, don’t forget to back up important documents before starting any repairs – just in case something goes wrong!
No matter what issue you’re facing with your Windows 10 device, using the DISM command tool may help you solve it quicker than other solutions – though we hope not too much faster! With proper preparation and knowledge of how long it might take to repair a windows 10 image using the dism tool, you’ll be well-equipped to tackle any trouble that arises while restoring your machine’s functionality.
What Are The Potential Risks Associated With Using The Dism Command Tool?
Using the DISM command tool to repair a Windows 10 image is an effective way of fixing any corrupted data or files, but it does come with certain risks. If you’re considering using this powerful tool, you should understand these potential issues before proceeding.
Firstly, if misused, the DISM command can cause significant damage to your system and important data. The complex nature of some commands means that even experienced users may be unaware of what will happen until it’s too late. For example, if the wrong parameters are used in a specific command, it could potentially delete all information from your hard drive. It’s also worth noting that incorrect use of DISM can cause conflicts with other software applications on your computer, leading to further problems.
Fortunately, there are measures you can take to reduce the chances of something going wrong when using this tool. Firstly, ensure you have a backup copy of all essential documents and data before running any repairs. This ensures that everything will remain safe and secure if anything needs restoring, no matter how bad things get during the repair process. Additionally, always check online for advice and help regarding each command so that you know exactly what they do before running them and read up on how best to use them correctly.
Although there is risk involved with using DISM Command Tool to repair Windows 10 images, you can ensure maximum safety by taking extra precautionary steps such as creating a backup beforehand and researching each step thoroughly.
Is There A Way To Check The Health Of A Windows 10 Image Before Using The Dism Tool?
When using the powerful DISM command tool, every Windows 10 user should take precautions. While this utility can help repair an image of the operating system, there is no way for users to check for any underlying issues before running the program. But does that mean we are entirely in the dark when utilising DISM? Not necessarily!
Like a beam of light cutting through the darkness, there are ways to inspect an existing Windows 10 image before diving into a potentially dangerous situation. Taking a few precautionary steps can safeguard your computer from any unforeseen risks associated with using DISM. So what do you need to look out for?
The first step is performing a health check on your Windows 10 image. This will ensure that everything works as expected and that no hidden problems lurking beneath the surface. To get started, open Command Prompt (or PowerShell) and type “DISM /Online /Cleanup-Image /CheckHealth” – this will scan your OS and let you know if anything needs fixing or repairing. If so, you may want to back up all important files just in case something goes wrong while attempting repairs via DISM later on.
By correctly assessing the health of your system beforehand, you’ll have greater peace of mind knowing that you’re well prepared for any challenges ahead – without having to worry about unexpected mishaps during vital maintenance tasks like repairing images with DISM. With these simple steps in place, you can confidently move forward with ensuring your Windows 10 setup runs smoothly and efficiently at all times!
Conclusion
In conclusion, the DISM command tool is a robust and reliable way to repair Windows 10 images. It’s faster than other tools, taking just minutes to complete compared to hours when using alternative methods. That said, it does come with some risks; users should always check the health of their image before running the tool.
Overall, at least 11 million people are now using Windows 10 worldwide – representing an increase of over 300% since 2015. This highlights how valuable this tool can be in ensuring everyone has access to a healthy version of the OS as quickly as possible. I hope that my article has provided you with enough information about how to use the DISM command for your own needs!

